
Continuous integration and continuous delivery (CI/CD) have become cornerstone practices, enabling teams to deliver code changes more frequently and reliably. Microsoft’s Azure DevOps offers a suite of development tools supporting teams in planning work, collaborating on code development, and building and deploying applications.
Among these tools, Azure Pipelines stands out as a powerful service for automating the build, testing, and deployment phases of your software projects. Whether you’re eyeing an Azure Certification or simply looking to streamline your development process, getting started with Azure Pipelines can significantly enhance your project’s efficiency and reliability. This blog post will guide you through setting up and configuring Azure Pipelines for your projects, ensuring you have a solid foundation to automate your workflows.
Introduction to Azure Pipelines
Azure Pipelines is a cloud service that automates the building, testing, and deployment of code projects across multiple platforms. Moreover, it integrates seamlessly with Azure services, GitHub, and other providers, making it an incredibly flexible tool for managing CI/CD pipelines.
Key Features of Azure Pipelines
Support for Multiple Languages and Platforms: Whether your project is in .NET, Java, JavaScript, Python, or any other major programming language, Azure Pipelines can handle it.
- Extensive Integration: With support for GitHub, Azure Repos, Bitbucket, and other version control systems, it fits perfectly into your existing workflow.
- Customizable Build Environments: You can define your build environment with hosted agents provided by Azure or use self-hosted agents for more control.
- Parallel and Matrix Builds: Speed up your build process by running jobs in parallel or using matrix strategies to test across multiple environments simultaneously.
- Live and Historical Data: Azure Pipelines provides rich insights into your builds and deployments, helping you track progress and troubleshoot issues.
Setting Up Your First Azure Pipeline
Getting started with Azure Pipelines involves a few key steps, from setting up your Azure DevOps account to configuring your first pipeline. Here’s a step-by-step guide to help you through the process.
Step 1: Create an Azure DevOps Account
If you haven’t already, the first step is to create an Azure DevOps account. Visit the Azure DevOps website, sign up for free, and create a new project. This project will house your pipelines and other Azure DevOps resources.
Step 2: Connect Your Source Code Repository
Azure Pipelines works with repositories from Azure Repos, GitHub, Bitbucket, and more. To connect your repo:
- In your Azure DevOps project, navigate to the Pipelines section and create a new pipeline.
- Choose the source control service hosting your code and select the repository to build.
Step 3: Define Your Pipeline
Azure Pipelines allows you to define your CI/CD process as code using a YAML file. This file specifies the steps to run during your build or deployment.
After selecting your repository, you’ll be prompted to configure your pipeline. You can start with a template or define your own steps.
Use the online editor to create or modify your azure-pipelines.yml file. Here’s a simple example for a Node.js application:
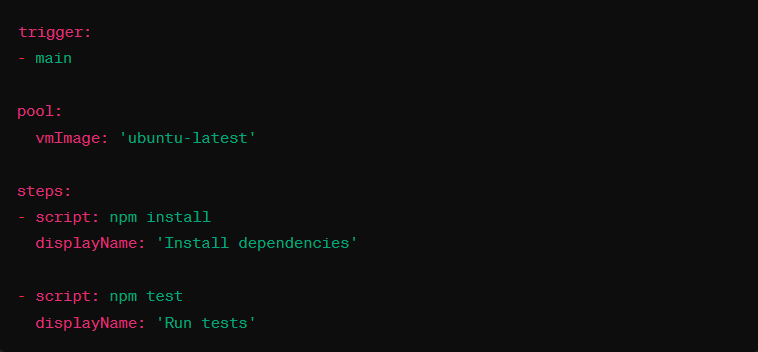
This YAML file defines a pipeline that triggers commits to the main branch, runs on an Ubuntu VM, installs dependencies, and executes tests.
Step 4: Run Your Pipeline
With your pipeline defined, commit the azure-pipelines.yml file to your repository. Azure Pipelines will automatically detect this commit and run the pipeline. You can monitor the progress, view logs, and troubleshoot issues directly from the Azure DevOps portal.
Step 5: Adjust and Expand Your Pipeline
As your project evolves, you may need to adjust your pipeline to add more stages, deploy to different environments, or integrate with other Azure services. The flexibility of Azure Pipelines allows you to modify your azure-pipelines.yml file to meet your changing needs.
Best Practices for Using Azure Pipelines
To get the most out of Azure Pipelines, consider the following best practices:
- Use Templates: Reuse pipeline configurations for common tasks to ensure consistency and save time.
- Manage Secrets Securely: Securely stores sensitive information like passwords and API keys in Azure Pipelines.
- Leverage Parallel Jobs: Run tests in parallel to reduce build times and get feedback faster.
- Review the Documentation: Azure’s comprehensive documentation offers guidance and best practices for advanced pipeline configurations.
Conclusion
Azure Pipelines is a robust, flexible tool that can transform your CI/CD process, making it more efficient and reliable. Whether you’re pursuing an Azure Certification or looking to enhance your project’s delivery pipeline, taking the time to learn and implement Azure Pipelines is a valuable investment. By following the steps outlined in this guide, you’ll be well on your way to automating your builds, tests, and deployments, enabling you to focus more on development and less on the intricacies of project management.
Read Also: https://classicalmag.com/what-is-a-performance-management-system-how-to-increase-it/


